Thursday, December 29, 2011

Christmas Recycled


We are putting away our Christmas decorations. For me, it gets to the point where it all just feels like so. much. clutter. I try to hold out until New Year's Day... but can't! I love the feeling of empty space when it is all cleared out and we have our house back. I thought I would share a couple of ways we "go green" as the Christmas season ends.


1. Ornament Storage
Nearly every time I go to Costco, I pick up a dozen apples. They are a staple in our fridge for school lunches and afternoon snacks. The containers in which the apples come are made of 70% recycled drink bottles, are recyclable, but are too way cool to throw away. They work perfectly to store many of our ornaments!

2. Ribbon Re-Do
I LOVE to wrap presents with real, woven-cloth ribbon! I love the luxury of big bows tied onto the packages. No wimpy, stringy, curling ribbon or stick-on bows for me!!! "It's so expensive," you say. Well, not really if you buy the big, 50-yard rolls of ribbon at Costco for just $6, and/or stock up at the after-Christmas clearance sales at the craft stores.

Plus, here is my big secret... I recycle much of our ribbon! Yes, I have trained my kids when opening presents on Christmas morning: "The paper goes in the trash bag. Pile the ribbon up by Mommy." Then, it is my job later to carefully smooth out and roll up that pile of ribbon. And, to make sure I find it when I need it, I put it away in our boxes of Christmas decorations. By taking care to store it, it is ready for wrapping next year. If you get a gift from me, you may wonder if the ribbon is recycled, but you probably won't be able to tell for sure!


How do you recycle {& I'm not talking about re-gifting!} at Christmas?

Wednesday, December 28, 2011

My Baby Boy is 15!

This cute baby boy who has given me so much joy...


Is turning into a man right before my eyes!


Today we celebrate Zac as he turns 15! We so proud of the fine young man he is... great citizen, hard worker, awesome student, wonderful son! We love you Zachary!!! Happy Birthday!!!


Sunday, December 25, 2011

Merry Christmas!


Merry Christmas from our home to yours! What a joy to celebrate the birth of our precious Savior! Blessings!

Thursday, December 22, 2011

Spinach Garlic Stuffing Recipe

My sister makes this awesome stuffing. I have never liked the dressing or stuffing that usually accompanies Thanksgiving or Christmas dinner. But my sister's stuffing, that is a whole 'nother story! I love it! I actually will make traditional cornbread dressing because my husband likes that. AND I will make my sister's stuffing, as well. I have been doing this for probably ten years.  It is GOOD!


Dana's Spinach Garlic Stuffing

20 oz. frozen spinach, thawed and drained (I have successfully subbed fresh baby spinach)
1 cup butter
8 oz. mushrooms, sliced
2 stalks celery, sliced
1 whole onion, diced
2 heads fresh garlic, peeled (lots and lots of garlic cloves you will keep whole, or cut in half!)
6 cups fresh bread crumbs (I get sourdough bread and cut into 1" cubes)
15 oz. ricotta cheese
2 eggs
1 Tb dried parsley
2 tsp salt
1 tsp poultry seasoning
pepper

Stir fry the veggies in the butter. Add all the other ingredients and mix well. This can be stuffed in the turkey and also under the skin to add good flavor to the bird. Or, place in a greased casserole dish and bake covered at 350 degrees for 45 minutes. I like to bake it in a dish and uncover it at the end so it gets crispy on top.

{Note to my friends who had this with me this Thanksgiving.... I actually messed up and doubled the amount of poultry seasoning when I served it to you! This recipe calls for less poultry seasoning than what you tasted.}

Monday, December 19, 2011

Just keep smiling!


Last week was one of those weeks! The downstairs heat went out last Saturday and wasn't fixed until Friday... I was settling into my new job... I was co-coordinator for a middle school ministry Christmas party for 150 Tuesday evening... I was responsible for getting 24 freshly-printed and properly-identified t-shirts to Jacob's class party on Thursday {after learning on Monday that they had been printed on the wrong color shirt, but that all worked out fine!}... I was scheduled to volunteer with the 7th grade "Victorian Celebration" at Abbie's school on Thursday... I have been assisting numerous customers with Christmas orders and deliveries and design projects... I was working on our Christmas card and letter... I had kids to watch and errands to run and packages to get ready to mail... all while certain rooms of my house look like something exploded. 

Making dinner wasn't exactly at the top of my To Do list! I was so glad when I had the inspiration on Thursday to make Tamale Pie. But then, in my distraction, I burnt the cornmeal I was cooking on top of the stove that was supposed to be the crust, and not just a little. I had a good 3/8" of black, burnt crust on the bottom of my little stainless steel pot. I was a little flustered, and set it down on my butcher block. {The butcher block my mother had commissioned someone to make for her over 25 years ago. The butcher block that has also belonged to my sister, and for the last 8 years has been mine. That butcher block.} 

When I picked up the pan and saw the mark, it did look like a happy face to me! I just had to laugh. I posted a funny status on facebook: "My reputation is ruined! I just burnt dinner. On to plan B..." Plan B ended up being burritos, using the filling that would have gone in the tamale pie. Everyone agreed that dinner was tasty, fortunately.

The burnt mark on the butcher block might be able to be sanded away. Or it might stay. Gil says it adds character. Right now it is a reminder to keep smiling! Enjoy the moments. We are so blessed and have so much for which to give thanks!

Just keep smiling..... even when your husband surprises you with the news that you will be dog sitting for the next week!


Sunday, December 18, 2011

Christmas is for kids


But Jesus called the children to him and said, “Let the little children come to me, and do not hinder them, for the kingdom of God belongs to such as these."
~Luke 18:16


Right in my kitchen I have a beloved Nativity set. Whenever small children come to visit, they are immediately attracted to it. And their mamas are almost always heard asking, "Are you supposed to be touching that?"

And my response is always, "That's why it is there."

I love that kids can touch and feel and act out the Christmas Story. It should be right within their reach. My children have always loved playing with this set. And I can always count on one of them to put it back "right" after other kids have come along and set it up their way. I love that having this Nativity right at hand and eye level allows the opportunity to talk about Jesus and God and this beautiful season of Christmas!


I am linking this post up with Richella at Imparting Grace. She is having a Home for the Holy Days party!

Wednesday, December 7, 2011

It's a Giveaway Day!

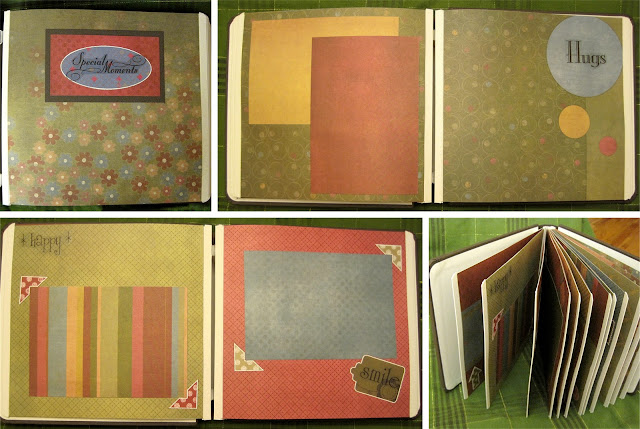
Welcome to my blog today! I am pleased and proud to be partnering with Modern Parent to give away this beautiful 8x8 pre-decorated scrapbook. You can go to the Modern Parent Facebook Page to get the details for this one-day (December 8th, 2011) giveaway!

If you want to give a gift from the heart, here is an easy way to share love and memories with minimal effort. I have already done most of the work for you!!! {But guess what... it was easy... I used a kit so it all came together really quickly!}


This cute 8x8 album has a classic chocolate cover (that can be personalized with added Persona Imprinting). The 24 inside pages are already decorated and ready for your pictures. These rich, earthy colors work well for a guy, like your husband or dad, as well as your mom or best girlfriend!


Each page is unique and will be even more beautiful with YOUR photos on it!


This prize package includes everything you need to make a special, sure-to-be-loved gift! Just add pictures!!! The pages are ready to go, complete with beautiful papers, stickers, and photo mats. In addition, you will receive a Tape Runner adhesive dispenser for attaching your pictures to the pages. Once your album is complete, Page Protectors slip on to add the finishing touch. All of this is worth nearly $72.


All YOU need to do is gather up your pictures, get them printed, and stick them down.


See how the photo mats are the perfect size for 4x6 photos? You can also add your own captions and sentiments directly to the pages. Cute and easy and memorable!

Be sure to check out Modern Parent to get yourself into the drawing for this sweet gift. You can also visit {& Like!} my Facebook Page, too! And if you don't win... well, I have lots of other options for you! Who in your life would appreciate a lovely little scrapbook made just for them?

{Simply Said mini-books}

Tuesday, December 6, 2011

My Husband Rocks!

Looking through my pictures, I see that I have lots and lots to share and I have no delusions of ever catching up. But here is something cute I can't resist sharing today. Pulling food out of the freezer yesterday for our meal last night reminded me!

A few weeks ago I had cooked a huge lunch of Chile Verde and homemade refried beans. We were having company after church, so I spent hours the day before prepping everything. I had my crockpot and roaster going Sunday morning so that when we arrived home, the delicious lunch was waiting for us to enjoy. 

As soon as our company left, Abbie and I wanted to head out to do a little shopping before we went to church that evening. But my dilemma was that I had a lot of food to put away (I call them "planned-overs"!). Well, Gil graciously offered to package up and freeze the food so that we could leave without delay. So sweet!!!

Well, I just had to giggle when a few days later I went to the freezer and this is what I found. He made my day with this sweetness. And each time I see these (now dwindling) containers in the freezer I smile. He loves me!!!


Saturday, December 3, 2011

Time for Tea!


Today is the day! It is our annual Christmas Tea at church! {I wrote about it here and here last year!} I have three friends attending with me, plus four others who bought tickets will sit at my table with us. We have 80 tables all beautifully decorated, which is always a feast for the eyes.

I set my table up Thursday after school with the help of Abbie & Jacob. Then I went back yesterday to add a finishing touch and see all the other tables that had been decorated. I am looking forward to this afternoon and my SIXTH year enjoying this wonderful tradition!!!

{I am having so many issues with blogger letting me upload my photos... I don't know what is going on. After twelve attempts, this is the only one that would work and it isn't right, either. Hopefully I will be able to upload all the tea table photos I have taken!}

Wednesday, November 30, 2011

Green Chile Chicken Enchilada Recipe

Here is one of our family's favorite meals! It is also what I most often take to friends who just had a baby, or have been sick. We serve this with refried beans, and with some salsa and sour cream on the side.


Green Chile Chicken Enchiladas
Original recipe by Terri Cendejas

Makes 12-20 servings (2 13x9 baking dishes)

¼ cup olive oil
½ cup flour
1 Tb ground cumin
1 Tb chile powder
1 tsp oregano
1 tsp garlic powder
1 tsp salt
pepper
1 cup canned green chiles, pureed or chopped (or 8 oz chopped green chiles)
6 cups water (or 3 cups water & 3 cups chicken stock)
7 cooked chicken breast halves, cut up into small cubes (or 2-3 cups diced turkey or chicken)
1.5 lb grated sharp cheddar cheese (about 3 cups)
1.5 lb grated mozzarella cheese (about 3 cups)
16 large (12”) flour tortillas, use more if they are smaller (Can also use corn tortillas)
                                                                                                                                                          
Sauce:
Heat olive oil over medium heat in deep fry pan. Whisk in flour and dry spices to form a roux. Cook for about 3 minutes while stirring. Slowly add liquid to form sauce. Bring to a simmer and cook for 10 minutes. Add green chile and cook for an additional 5 minutes. Cool.

Filling:
Toss together chicken and 1-2 cups of sauce. Add ¾ of the cheeses, and toss gently. Reserve 2 cups of sauce. Add remaining sauce to the chicken and cheese mixture and combine.

Assembly:
Ladle ½-¾ cup sauce on bottom of each baking dish. Spread evenly. Taking one tortilla at a time, spoon filling along one side and roll up, leaving ends open. Place enchilada in baking dish. Repeat until all the filling is gone, squeezing enchiladas into the pan if necessary. Top both pans of enchiladas with even layer of remaining enchilada sauce... it won’t cover completely, but each enchilada should have at least a little dab. Finish with remaining grated cheese spread evenly on top of both pans. Bake at 350 degrees for 30 minutes or until bubbly and browning slightly on top. Once assembled, you can refrigerate the enchiladas and heat later. Heating will take 10-15 minutes longer.

Tips:
Make one and freeze one! After assembly, only put cheese on top of the one you will cook immediately. Wrap the second one with plastic tightly over the enchiladas (no air space), and then tightly with foil. With a Sharpie, write the meal name, baking instructions, and date directly on the foil before putting in it the freezer. If you put the second set of enchiladas in a disposable foil pan, you will have a meal you can give away, too.

Tuesday, November 29, 2011

Love Displayed in Meaningful Gifts!

During this wonderful season of giving (and all year, actually), I love to give gifts that are unique and meaningful. Here are a few fun gift ideas for you. {Bonus, I can help you with any or all of them!} If you are looking for information on my Beautiful Blog Books, click here!


Personalized photo gifts always are a favorite and much enjoyed by the recipient! Here are a few gifts I made this past year. The Photo Panel is wood and acrylic, but also comes in metal. {Free templates make it easy to put together yourself, or custom options can be designed.} Look here, and you will see how I am using another Photo Panel as my countertop dry-erase board!

The Custom Album Coverset can hold scrapbook pages or digital page prints. It can also be designed online, or made completely to your specifications.  Items like mugs, mousepads and t-shirts are always fun, too! Who wouldn't want to enjoy daily seeing their favorite people on an everyday item???

Photo Calendars are another wonderful gift! Pictured here is a 12"x18" calendar... the page can then be inserted into a 12"x12" scrapbook when the month is over. This style is also available in 8"x12", for an 8"x8" album.

The calendar plus an album makes a wonderful gift for grandparents. {I like these luxurious 12"x12" Picfolio albums -- they will hold almost three years' worth of calendar pages!}

Another idea is to use the calendar pages for heritage photos... walk down memory lane with all your pictures from growing up, and give the calendars to your siblings. In 2-3 years, you will all have your own completed family album!

The desk calendar is new! It has it's own easel, and the 4"x6" images also tear out. It is a great size to put on a desk at work, or to carry when traveling. Every month can highlight a special memory or cherished person.

All of these calendars can be customized with one or more photos, words and quotes, as well as special dates and events. You can go here to see more info about them. Again, I am happy to help you with your custom calendars!


Now, here is another fun and personal gift! The Simply Said books are sweet little 7.5"x5" books ready for you to fill in the blanks with your photos and feelings. Don't know what to write? It is easy with the prompts that are provided!


So do you have a special person you want to bless this holiday season? These are all fun and easy ideas... and of course, there are also photo books, cards, photo displays albums, and more! I would be pleased to help you with your personalized photo gifts... in person or by email {terricendejas at gmail dot com}!

{If you create a Creative Memories Digital Center account, please use my Consultant ID: 24915986}

Sunday, November 27, 2011

non-traditional tradition


Here is one of our post-holiday traditions! We scour the supermarkets looking for marked down fresh turkeys after the holiday is over. This year we {meaning Gil, who so graciously went out shopping for me!} found two 20lb turkeys for $.39 a pound. Since we ate our Thanksgiving dinner at the home of a friend, we didn’t have our own turkey leftovers. Which leads to another tradition… having to cook a second Thanksgiving meal just for our family!

Saturday we enjoyed our second Thanksgiving meal. And then I used the turkey to make my famous Green Chile Chicken {in this case, turkey} Enchiladas. They were yummy!!! {I’ll post that recipe soon.} The rest of the cooked meat from the turkeys will be frozen for future meals. I love a good deal!

Saturday, November 26, 2011

The Evolution of a Photo Panel


This photo is one from my surprise birthday party earlier this month. What sweet friends I have! What you may not have noticed in the picture is up behind me on the mantle -- it s a photo panel that I designed last year and gave to my family for Christmas. A photo panel is either wood coated in acrylic, or metal, and makes a wonderful display in several sizes. I just love ours! 

Well, I had a product credit toward another photo panel that needed to be used, so I decided that I would make a special one for myself.


I thought it would be fun to show my design process from the beginning, to the final outcome. And, even though it is called a photo panel... I didn't plan to include any pictures on it! I looked through my digital artwork collection to see what embellishments and papers I wanted to use. I knew I wanted colors that go with our other decor since I would have it in the kitchen. I also love hearts. And these little birds were so cute! So that was my starting point.


I found some other embellishments I liked and played around with the center shape. I needed more area in the middle than the first big heart had provided. I liked the paper with the writing, even though you can't read it.


I decided the first background looked too solid, so I swapped it for a different patterned paper. I also went with a simpler shape in the middle and tweaked the other elements. I am liking how this looks!!


Now I am starting to get excited because I think it is looking really cute. I love the little bunting and the scallop backing gives it a nice touch.


From the beginning, I knew I wanted to include scripture. If you go back to the first draft, I actually had scripture running around the outside of the heart. Since I also liked the look of the paper with writing, I decided I could make my own. So I added a bunch of my favorite verses in a variety of fonts, and it was done! I love it!!!


And here is my photo panel on my kitchen counter. So pretty!


Oh, did I mention that I can use it as a dry erase board?!? Acrylic photo panels can be written on with dry erase markers! This makes a great place on which to write my list of tasks for the day.


I am so excited that I can post my nightly menu and stop all those repetitive questions from the kids about what I am making tonight! This just makes me happy. What could you use a little dry erase board for? You know what else makes me happy about this? I used host credit toward the product credit, so all I paid for my fun little project was tax & shipping!

Friday, November 25, 2011

Thankfulness

Since our first Thanksgiving in Charlotte in 2006, we have been blessed to have friends with whom we could share the day. This year we were invited by our friends and neighbors, Sean & Julie, to have Thanksgiving with them. They had two other families coming, as well as our good friends, Alan & Jennifer. 

We all divided up the cooking -- I was assigned rolls, cranberries, and pies. But, I also had to add in our family's traditional deviled eggs and my sister's famous stuffing, as well as whipped cream for the pies. Thanksgiving day was actually pretty relaxing because I was able to get most of my preparations done the day before. {I have been asked to share my recipes, so expect some of them to appear here soon as I type them up!}

Sean getting ready to bless the meal, what a spread of food!, Julie serving her son

We gathered around 4pm. Soon, Julie's kitchen was filled with all sorts of yummy foods! We truly had a feast of flavors. Everything was so good!!!

Julie, Alan, Jennifer

Dinner was so good that I don't think any of the adults even ate any dessert! I know I couldn't. {But that's ok because pumpkin pie for breakfast is one of my favorite things about Thanksgiving!!!}


Our sweet kids shared their own table. Jacob and Julie's daughter are in the same class, and were in kindergarten together.


We enjoyed spending time with Alan and Jennifer!


Me and my sweetie! I wish I had gotten a photo of Sean and Julie together.


Abbie & Zac didn't have to sit at the kids' table! I love this picture and love these kids!!!


After dinner, my friend Yogi and her family stopped by Sean & Julie's for dessert. Yogi also brought along her sister and family. It just added to the fun!!!


I just love my friends!


We had a fun, full evening. The kids ate dessert, and roasted marshmallows at the firepit. Each family signed Julie's tablecloth, which is such a neat tradition. I feel so blessed to have my community of friends who are becoming like family. I am thankful for all the many blessings the Lord has given me!
Related Posts Widget for Blogs by LinkWithin