Showing posts with label fast and easy. Show all posts

Wednesday, December 7, 2011

It's a Giveaway Day!

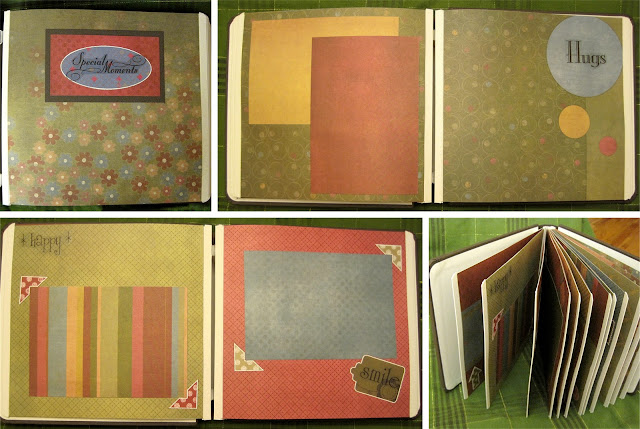
Welcome to my blog today! I am pleased and proud to be partnering with Modern Parent to give away this beautiful 8x8 pre-decorated scrapbook. You can go to the Modern Parent Facebook Page to get the details for this one-day (December 8th, 2011) giveaway!

If you want to give a gift from the heart, here is an easy way to share love and memories with minimal effort. I have already done most of the work for you!!! {But guess what... it was easy... I used a kit so it all came together really quickly!}


This cute 8x8 album has a classic chocolate cover (that can be personalized with added Persona Imprinting). The 24 inside pages are already decorated and ready for your pictures. These rich, earthy colors work well for a guy, like your husband or dad, as well as your mom or best girlfriend!


Each page is unique and will be even more beautiful with YOUR photos on it!


This prize package includes everything you need to make a special, sure-to-be-loved gift! Just add pictures!!! The pages are ready to go, complete with beautiful papers, stickers, and photo mats. In addition, you will receive a Tape Runner adhesive dispenser for attaching your pictures to the pages. Once your album is complete, Page Protectors slip on to add the finishing touch. All of this is worth nearly $72.


All YOU need to do is gather up your pictures, get them printed, and stick them down.


See how the photo mats are the perfect size for 4x6 photos? You can also add your own captions and sentiments directly to the pages. Cute and easy and memorable!

Be sure to check out Modern Parent to get yourself into the drawing for this sweet gift. You can also visit {& Like!} my Facebook Page, too! And if you don't win... well, I have lots of other options for you! Who in your life would appreciate a lovely little scrapbook made just for them?

{Simply Said mini-books}

Tuesday, November 29, 2011

Love Displayed in Meaningful Gifts!

During this wonderful season of giving (and all year, actually), I love to give gifts that are unique and meaningful. Here are a few fun gift ideas for you. {Bonus, I can help you with any or all of them!} If you are looking for information on my Beautiful Blog Books, click here!


Personalized photo gifts always are a favorite and much enjoyed by the recipient! Here are a few gifts I made this past year. The Photo Panel is wood and acrylic, but also comes in metal. {Free templates make it easy to put together yourself, or custom options can be designed.} Look here, and you will see how I am using another Photo Panel as my countertop dry-erase board!

The Custom Album Coverset can hold scrapbook pages or digital page prints. It can also be designed online, or made completely to your specifications.  Items like mugs, mousepads and t-shirts are always fun, too! Who wouldn't want to enjoy daily seeing their favorite people on an everyday item???

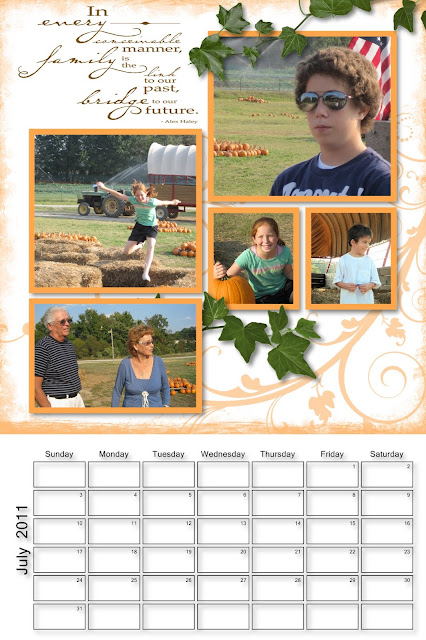
Photo Calendars are another wonderful gift! Pictured here is a 12"x18" calendar... the page can then be inserted into a 12"x12" scrapbook when the month is over. This style is also available in 8"x12", for an 8"x8" album.

The calendar plus an album makes a wonderful gift for grandparents. {I like these luxurious 12"x12" Picfolio albums -- they will hold almost three years' worth of calendar pages!}

Another idea is to use the calendar pages for heritage photos... walk down memory lane with all your pictures from growing up, and give the calendars to your siblings. In 2-3 years, you will all have your own completed family album!

The desk calendar is new! It has it's own easel, and the 4"x6" images also tear out. It is a great size to put on a desk at work, or to carry when traveling. Every month can highlight a special memory or cherished person.

All of these calendars can be customized with one or more photos, words and quotes, as well as special dates and events. You can go here to see more info about them. Again, I am happy to help you with your custom calendars!


Now, here is another fun and personal gift! The Simply Said books are sweet little 7.5"x5" books ready for you to fill in the blanks with your photos and feelings. Don't know what to write? It is easy with the prompts that are provided!


So do you have a special person you want to bless this holiday season? These are all fun and easy ideas... and of course, there are also photo books, cards, photo displays albums, and more! I would be pleased to help you with your personalized photo gifts... in person or by email {terricendejas at gmail dot com}!

{If you create a Creative Memories Digital Center account, please use my Consultant ID: 24915986}

Monday, October 24, 2011

Packing Lunches Made Easy!

Packing school lunches everyday for my 3 kids, plus my husband can be time consuming, day after day. Pre-packaged items would be faster and easier, but can be expensive and not as nutritious. Each week I am packing 20 lunches --- I want it to be as easy as possible!

I often get the kids involved in helping me prep a week's worth of our own pre-packaged items. I give them recycled applesauce cups to use to measure portion size, and we fill small zip snack-size bags with pretzels, gold fish, baby carrots, grapes, cheese cubes, lunch meat, etc.
We fill up a giant, recycled pretzel container in the cupboard with the bags of pretzels and gold fish, making them easy to grab as lunches are packed. {It is very clear that this container is for lunches only!! Not for general snacking. We have other containers for snacks.} Other lunch items are kept together in the fridge, usually in our bottom drawer.

In addition, I bake double batches of healthy treats like banana bread, and cookies or brownies with whole wheat flour, and wrap them up into individual portions and freeze in a large zip bag. Each morning I pull out their frozen treat for their lunch box. It will be thawed by lunch time, and nearly as fresh as the day I baked it.

Having everything pre-portioned and ready to go makes my morning routine quick and smooth, and helps me give my kids and husband healthy lunches every day! What tips do you have to make lunches easy and healthy?

Monday, June 13, 2011

Fun Cutting Tools

I love my Jumbo Custom Cutting System Patterns for making quick, traditional scrapbook pages! With one simple cut, I get a neat border, plus a piece to add to another page. Two pages from one piece of paper!


I have been working on Jacob's toddler pages... really enjoying my trip down memory lane! Here is a page I love, using the circle that was left over when I cut a border for another page, using the Jumbo Circle Pattern.


Now, when I started out with that red circle all by itself, it looked a little too much like a Japanese flag!


So, I decided to cut it up, and shift things around a bit. I started with one straight cut off of one side... no need to be exact.
I then made a second cut of of the larger piece. Again, just eyeballing things.
I took those 3 pieces and arranged them so that all the straight edges and corners were against the outside of the page.
I added a photo mat, 3 pictures, some fun embellishments, and some title stickers. {Using a Power Palette ensures that everything matches, and really cuts down on time!} I think it turned out pretty cute, and only took about 10 minutes!


You could do the same thing with any of the cutting patterns. {Good news! Through June 30th, 2011, all of our top cutting tools are on sale for 20% off!}

Tuesday, February 8, 2011

Fun Birthday Party!

In my last post, I wished my sweet husband happy birthday! Well, here is the party I threw to celebrate him! I designed the invitation, sent it out by email, and handed some out in person. Then I let Gil know that we were having a party! My hope was for him to be incredibly blessed on this important milestone.

We really had no idea who was coming. I just invited everyone we know and care about. I ordered a low-cost cake from Costco, made some homemade salsa, and put out a bowl of chips, and we were ready! This was a super-easy party to throw! And since everyone was invited to bring an appetizer, we had plenty of food!!!

This was such a fun gathering!!! We had friends from all over stop in. I made sure to take a photo of each family or couple.

Over the course of the evening, we had 70 guests in our home! Gil was absolutely blown away. Everytime the doorbell rang, it was another surprise. Gil was so very blessed by this wonderful, easy-to-plan event. What a joy it was to show him how much he is truly loved, in honor of his special day!!!

Monday, November 8, 2010

Celebrating your Star!

I am in the process of working on an end-of-season coach gift and remembered this picture I wanted to share. One of my awesome customers has kids who are athletes. Last spring, her daughter's softball team had a perfect 17-0 season!!! To celebrate, Susan made her daughter this gorgeous poster! I happened to be at Susan's home a while back and was able to see it in person and take a photo {that in no way does this 20x30 poster justice}!
Isn't this such a cool idea?! It is a natural for celebrating a coach or an athlete... but would also be great for a teacher, a dancer, a cheerleader, a pet lover, a horse rider, a special couple, a grad, a dad.... well, you get the picture! What a terrific gift for a hard-to-please teen. It is so easy to get started because you can go here to pick out free designs, upload some photos, drop them in, and order! {If you need a consultant ID for your CM Digital Center account, you can use mine: 24915986.}

I am also able to make custom posters for you in a variety of sizes. You send me the photos and I send you the finished product ready for hanging or framing. What fun project would you like to display?

Monday, November 1, 2010

Dual Duty Gift

What a relief to have one Christmas gift completed and ordered! Gil's parents were just here for a week and I took as many pictures as I could. During the visit, the kids had a day off from school, and then Gil had them take two more days off to be with their grandparents. So they had some fun times out and about with Grandpa & Grandma Cendejas! However, I got fewer photos than I would have liked. But, I think I've made the most of those that we do have!!!

This is the custom photo calendar that I just ordered for Gil's parents' Christmas gift! This is really cool because the top strip with the spiral binding, and the calendar part on the bottom, both tear off, leaving an 8x8 scrapbook page.
Last year, Gil's parents visited and I sent them an 8x8 PicFolio Max album with several completed pages in it. The idea was to keep adding to it for them. The Max album is really nice because each page is a giant side-loading pocket, so it is super-easy for them to put in additional scrapbook pages.

Now they will have 12 additional pages for their album!

Because their visit was in October, most of our pictures are fall themed. I didn't try to worry about the months on the calendar, but thought instead about the flow of the scrapbook album. My intent was to document their visit, and the calendar was just an extra bonus!

I actually created the calendar as a 12x18, which would make 12x12 scrapbook pages, or page prints. I always like to design in the larger size, then with a simple click I can convert my project down to the smaller size. That way, I can use some of these pages for our album!

I wanted to get this completed and ordered so I would have it for my Open House on November 20th. {December 13th is the deadline to order for Christmas delivery!} I actually started it Tuesday night. Then I worked on it again Saturday afternoon, finished it up, and got it ordered! I love digital scrapbooking because it is so quick!!!

I mostly used the Free Presdesigned templates found here, but I also adapted most of them somewhat. This page I played with using one picture for the whole page. I like it!

In just a few hours, I have 12 pages finished!

I think you can see that we had a good time at the pumpkin patch!


Of course, the visit was much too short... and the visits are far too infrquent... but Gil's parents can be reminded of our time together all year long!

Saturday, July 17, 2010

"I can do this myself!"

Yesterday I had the opportunity to meet a sweet friend for some yummy iced lemonade-green tea, and to chat about having me create a predecorated album for her to give as a gift. Her friend is in the process of adopting a 2 year old little girl. Susan wanted to give her an album that was ready for the mom to add photos and introduce this precious child to her new forever-family.

I love it when people decide to give albums for gifts! What could be more personal or perfect, no matter who it is for?! And I feel honored and blessed when I can be involved in the process.

Since this album was going to be handled by a toddler, I recommended the 8x8 PicFolio Max that has slip-in pockets for each scrapbook page. These albums are so durable, and great for little hands. I just happened to bring with me the Family Quick Kit to show Susan.

Well, it turns out that Susan absolutely loved the Family Quick Kit and the 8x8 album that coordinates! She thought it really fit her friend. When she saw the predecorated pages and the fun stickers and tags... she realized that she didn't need to hire me, after all! She said, "I can do this myself."

Wednesday, July 7, 2010

Easy Power Layouts

Abbie often asks me if we can do something together. She also noticed that while our family scrapbooks are "almost" caught up, her own scrapbook hasn't been updated since she was about 5 years old. So, for her birthday, I gave her a new album and some supplies. Yesterday, she was excited to work on her album. I intended to start her out right, so I led her through the Power Layouts technique!

Power Layouts is a method that is used to pre-plan an album using a sort of assembly-line process. It is one of my favorite speed techniques. When I am making a custom album for a client, I always start the project by doing Power Layouts for the whole book. When I am working on my own projects, I do the same. I have a number of customers who are very successful with keeping up on their albums because they have learned to make use of Power Layouts!

Step One: First you choose the photos you are going to use. It doesn't have to be every picture in a stack. We went into Abbie's Power Sort Box and picked out photos from the first several months of 2004. She immediately rejected any picture in her pile that didn't include her! The point is to narrow it down so that you are using the best pictures to represent an event. I try to keep in mind that each page will typically include 2-5 pictures. I also tend to limit most events to no more than two pages. Also, some photos won't fit into an event category, but are still worthy of going into an album. Go ahead and choose them, too!


Step Two: The next step is to lay out planning pages to start the Power Layout process. I use a combination of scrapbook pages and Power Layout Guides that come with the Power Layouts Kit. The white pages, above, represent scrapbook pages. The grey can be another scrapbook page, or a Power Layout Guide. The guides are nice because when it comes time to assemble the pages, you will only be attaching paper and pictures to the actual scrapbook page... with Guides, you won't make the mistake of attaching your layout to a filler page. I also lay out the planning pages so that I have my first page of the book, and then a series of two-page spreads.

Now, this step can take up a bit of room. But it is adaptable to whatever space you have available. You can do Power Layouts on an empty table, or across several tables. You can lay out pages in small batches using up the space you have, going through all of the following steps, then repeat the process. In my custom albums, I used lay out 90 pages on the floor, snaking around the house from the entry to the living room, to the dining room, and back again to the entry!

Step Three: The third step is to deal out all the photos onto the pages and Layout Guides. This is a quick process that gives you an overview of your album! At this point you will see if you have too many pictures for one layout, and how many two-page spreads you might need. You will also eliminate some pictures as you see that they may be redundant, or not as good as some others you have.

I like to have two-page spreads... so in this step, I can see if some of my layouts fall that way or not. I usually scrapbook chronologically, but I will rearrange the order of my pages, if necessary, to get my layouts to fall into two-page spreads. I also see if I have random photos that will group together into topical layouts. For instance, last year I had photos from three separate snow days. It made more sense to group them all into one snow layout. Power Layouts has the advantage of giving you that big-picture view of your scrapbook so that you can group photos in a way that is most efficient for the flow of the book.

Step Four: The fourth step is to crop, or trim, all the pictures that have been dealt out onto the planning pages, and to make a preliminary arrangement of the layout on the page. My preference is to group the photos close together, leaving open areas around the page for journaling, embellishments, and titles. I did notice that once I started printing digital photos, my need to crop my pictures was dramatically reduced. But these older pictures needed some help to remove background clutter and focus in on the subject. If you have any memorabilia, this would be the step to add that, as well.

Step Five: Now the fun begins! In step five, we start to choose the papers that will go with each page. Sheets of scrapbook paper can be left whole, or cut down to make it go further. You can stop with choosing the background paper, or also go ahead and choose the mats, journal boxes, stickers, and other embellishments that will go on the page. Those items will be be dealt out onto the pages, ready for the assembly step.

Step Six: In Step Six, you are basically done with Power Layouts! You stack up the planned pages, with the first page on top and the last page on the bottom. You can then store them in the box that comes with the Power Layouts Kit. Some people do this step at home, then just bring their Power Layouts Box with them to a workshop and assemble their pages. I have other croppers who do Power Layouts on 6 or 8 pages, complete the pages, then do Power Layouts again. Some like to do a batch of Power Layouts at my workshops, then do their assembly at home. It is all about what works for you!


Step Seven: This is the time to be creative and play! The first steps of Power Layouts are where a lot of decision-making is done and less creativity is needed. In this final step, you are assembling the pages, and adding decorative touches. You will pull out the first page from the Power Layouts Box, adhere it and complete it, turn it over, and then continue on with the next layout in your box. It is great because if you just have a few minutes, you can pick up where you left off and complete a page. Some people say they don't have room to scrapbook, or don't want to pull everything out... well, with this step all you need is your Power Layouts Box, and adhesive!

Abbie did great! We spent about 15 minutes on the Power Layouts. Less than 3 hours later, she had TWELVE completed pages!!! Are you ready to try some Power Layouts for yourself???

Tuesday, May 18, 2010

School's Almost Out!

The end of the school year brings celebrations, special activities, goodbyes, and many photo opportunities. You just may have a special student, teacher, or grad and be wondering what to do about an end of the year gift. Here are a few easy ideas you still have time to make!


With a completely-coordinated scrapbook kit, you can put together a teacher thank-you album in record time! {And if you are like me and love a bargain, check out these kits that are on clearance.} An easy idea is to give each student in the class a journaling box on which to write a note to the teacher. They can also submit a photo, or you can go to class and take pictures of each child for the book. Once you have the pictures and notes, the album goes together fast!

Personalized photo gifts are quick and easy to make, and are always appreciated! How about a T-Shirt with a class photo on it, a mousepad made with a scanned image of a child's artwork, a mug for a special teacher, a photo panel with a group picture to say thank you, or a poster for a grad to take to college? The great designs available make your project beautiful!

And for more great ideas, check out this helpful post about journaling your child's school year, and some photos you don't want to forget to take!

Friday, May 14, 2010

A Few Quick Cards

I used to love to browse through greeting cards. Buying them was my weakness. But then they seemed to get so expensive.

These days, I pull out my scrapbooking supplies and enjoy making my own cards! While I haven't gotten much scrapbooking done lately, I have managed to make a few cards on an as-needed basis. It is a great way to use up supplies and keep the creative juices flowing!


Wednesday, March 31, 2010

Aahhh... that feels better!

I am a girl who loves lists! I have a pretty spiral notebook that is full of lists... monthly To Do lists, project lists, gift-giving lists, book to read, etc. I also make a daily To Do list on a cute pad of paper {and sometimes it takes a day or two or three to get through that list!}. But what has been driving me crazy is that I haven't had a place to see all my various projects laid out in one spot. I am visual and need to SEE it or I feel so out sorts and not organized.

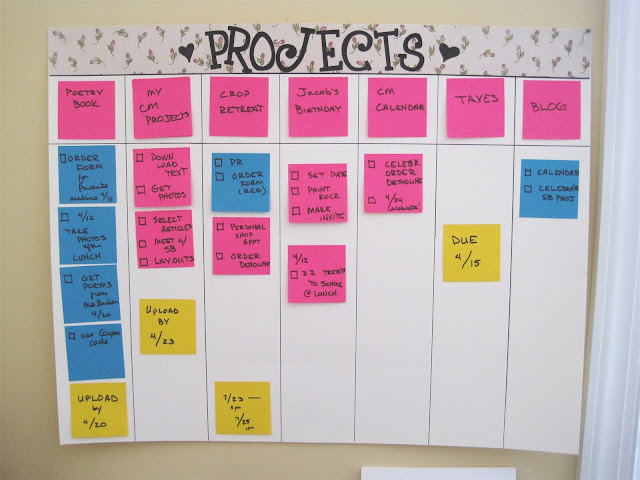
After months of trying a few different systems and the frustration of not having a system at all, I finally came up with a plan I feel confident will work! So today I invested a few minutes and used some items I had on hand to create my new Project Board. I know this new system will be flexible and fluid -- just what I need!

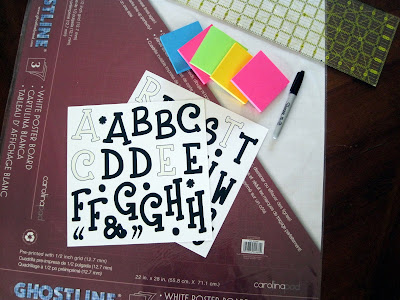
Here are the ingredients:
  • Poster Board, 28"x22" {mine has a light grid on it that made things simple}
  • A pack of Post It Notes {one of my most favorite things in the world!}
  • A Sharpie Marker
  • My Favorite ABC Stickers
  • A large Ruler
  • A few strips of Scrapbook Paper
When I played with the Post It Notes, I figured out that I could lay them out 7 columns by 6 rows. I decided I would use the top row for my Project Titles, and have the tasks and due dates on Post It Notes below the titles. All I had to do was draw a few lines to divide up the poster board into 4"-wide columns, attached a 2.5" strip of scrapbook paper across the top, put on my title, and attach it to the wall!

Instant organization! I feel soooo much better now! Can you tell I am in denial about getting my taxes done?


Also linking up with Works For Me Wednesday at We Are That Family!
Related Posts Widget for Blogs by LinkWithin